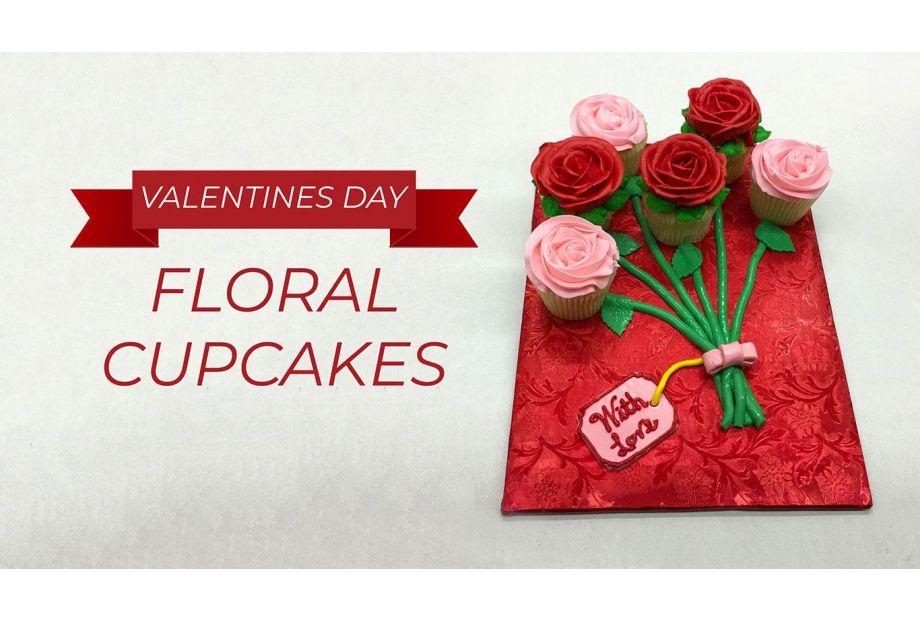
How to Make a Rose Cupcake Bouquet
This Valentine’s Day, don’t stress over whether cake or flowers are the better gift to give. Our cupcake bouquet can solve your present dilemma. Not only are these cupcake flowers beautiful, but they’re also edible too! Far better than a wilting bundle of store-bought flowers, these handmade flowers display your keen baking skills while letting your special someone know just how much you care.
Follow our step-by-step tutorial and we’ll guide you through the process of how to create your own beautiful cupcake bouquet!
INGREDIENTS
One ¼ cake board - Lined with your choice of foil for color
6 Cupcakes - Pick your loved one's favorite flavor
3lbs - Wilton White Decorators buttercream icing
Satin Ice fondant - For stems and leafs
4 Gel Icing Colors - Red, Green, Pink, Yellow
SUPPLIES
1 - Small leaf plunger cutter
1 - Medium square plaque cutter
3 - 18" piping bags
1 - 12" piping bag
1 Rose tip - Wilton No.127 - red petal frosting
1 Round tip - Wilton No. 3 - red writing frosting
1 Star tip - Wilton 1M - pink petal frosting
1 Leaf tip - Wilton No. 366 - green frosting
Paintbrush - For wetting fondant
Kitchen scissors
Large spatula
Knife or bench scrape
Rolling pin
Fondant extruder for stems (optional)
Step-By-Step Instructions
Step 1 - Decorate Your Cake Board
Cover your cake board with your choice of colored foil. For a clean presentation, simply wrapping excess foil around the edges of the cake board, tapping down the ends on the back to ensure the foil stays smooth and flat. The foil’s purpose is twofold: (1) provide a beautiful background on which to present your bouquet and (2) protect the cardboard from soaking up any of the icing’s excess color or moisture.
BAKERS’ PRO TIP: Save yourself the hassle and simply buy pre-covered boards. You can find them in the cake decorating section of most grocery stores.
Step 2 - Color Your Frosting
Separate your buttercream frosting into three mixing bowls: two medium-sized mixing bowls and one small mixing bowl. In the small mixing bowl, add 2-3 drops of green food coloring and stir till thoroughly combined. Continue adding one drop of food coloring at a time and thoroughly combining till you have reached your ideal shade of green for the leaves.
Repeat the above process with pink and red food coloring to create your ideal shade for the flowers petals. REMEMBER, a few drops can go a long way so add gradually.
BAKERS’ PRO TIP: Use gel food coloring because, despite the number of drops you add, it will not thin out your icing.
Step 3 - Prepare Your Icing Bags
Secure three piping bags, one for each color of icing. With one of the piping bags in hand, snuggly push your rose icing tip into the narrowest end of the bag. Place the piping bag into a glass, piping tip down. Fold the excess plastic from the piping bag down around the edges of the glass. Using your spatula, scoop your red frosting into the piping bag. Once all your frosting has been added to the bag, peel up the excess folds of plastic and secure the top of the bag by twisting the plastic several times. Complete this process with your other two piping bags and colored frostings.
Once your piping bags are filled and secured, you are ready to begin piping. Using a pair of kitchen scissors, cut off a small tip of plastic just below the piping tip. You will want to cut off just enough for half of the piping tip to poke through. This will ensure your icing can easily flow but not allow the piping tip to come out when the bag is squeezed. REMEMBER, you can always cut more but you can’t un-cut less.
BAKERS’ PRO TIP: Plastic piping bags work best for buttercream icing.
Step 4 - Decorate Your Cupcakes
When your icing bags are prepared, you are ready to begin decorating!
RED ROSES (Wilton 127 Rose Tip) - Begin by piping the center cone of your rose in the middle of your cupcake. While twisting the cupcake counter-clockwise, begin creating your flower petals by applying your icing in tall, thin arches. As you begin approaching the edges of your cupcake, continue to twist your cupcake counter-clockwise while gradually making your petal arches longer and longer until you reach the cupcake’s edge.** Once completed, set your cupcake aside and continue on your next cupcake.
PINK ROSES (Wilton 1M Star Tip) - Begin by piping at the center of the cupcake with the piping bag located perpendicular to the cake. Gently apply pressure to your piping bag so frosting begins to flow. Slowly make a clockwise swirling motion around the face of the cupcake working your way to the edge. Allow the frosting to overlap. Finish by slowly releasing pressure towards the edge of the cake. Once completed, set your cupcake aside and continue on your next cupcake.
BAKERS’ PRO TIP: Be certain to leave some room at the edge of your cupcakes so you can pipe leaves.
LEAVES (Wilton 366 Leaf Tip) - Begin by holding your piping bag at a slight upward angle from the surface of your cupcake. The two points of the tip should be vertical. Firmly squeeze to form the base of the leaf. As you squeeze, gradually pull the piping bag away and upward to give the leaf length and lift. Relax pressure as you create the leaf’s tip. Stop squeezing entirely before pulling the icing tip away. Once completed, set your cupcake aside and continue on your next cupcake.
BAKERS’ PRO TIP: Creating a good rose may take some practice. So remain patient and remember practice makes perfect.
Step 5 - Arrange Your Bouquet
In order to make your arrangement look like a real bouquet, position your cupcakes on the top half of the board. This will allow your fondant stems to extend down to the bottom of your board. To secure your flowers to your cake board, individually apply a small dollop of icing to the bottom of each cupcake.
Step 6 - Make Your Stems
Begin cleaning off a flat workspace on which you can knead your pre-colored fondant. At first, your fondant will be very stiff. However, after a few minutes of work, it will become soft and pliable. At this point in time, you can begin making your stems and leaves.
BAKERS’ PRO TIP: If you can’t find pre-colored fondant, you can always color your own! Follow the same process for coloring frosting in “Step 2” as a guide.
STEMS - Using a knife or a bench scraper, section off a portion of green fondant. Using the heel of your hands, begin rolling out long strands of fondant into thin strips. Once to you have reached your desired thickness, cut your stems to your desired length.
LEAVES - Using a rolling pin, begin to roll out a portion of the remaining fondant. Apply even pressure the length of the rolling pin to ensure the fondant stays an even thickness. Using your plunger cutter, punch out your desired number of leaves.
Step 7 - Position Your Stems and Leaves
Return to your cake board with your expertly placed cupcake flowers. Position your fondant stems at the base of each cupcake and extend down toward the bottom of the board. Cut off any excess fondant so the stems are all the same length.
Using a slightly dampened, small paint brush, gently dab the backsides of your leaves with water. The water allows the fondant leaves to adhere to the fondant stems. Place your fondant leaves where ever you think they look best.
Step 8 - Create Your Bouquet Tag
Using a rolling pin, begin to roll out a portion of the pink fondant. Apply even pressure the length of the rolling pin to ensure the fondant stays an even thickness. Using your square cutter, punch out a tag for your arrangement.
Step 9 - Make a Bow
Using a portion of your rolled pink fondant, cut and design a small bow. This will give the illusion the flowers are tied together. Place the bow about halfway down the length of stems and secure with a small dab of water. Using the clean piping tip, punch a small hole in on side of the tag. This will be made to look like the tag tie.
Step 10 - Write your Message
Prepare a piping bag with red and frosting by following the same process detailed in “Step 3.” Using a small round piping tip, write a special note for your special someone. Using the same piping bag, outline the outer edge of the tag.
Once you’ve completed the above steps, your cupcake bouquet is ready to be gifted! Place your bouquet on the table as a stunning centerpiece. If you need to transport your cupcake bouquet, simply slide your cake board into a cake box.